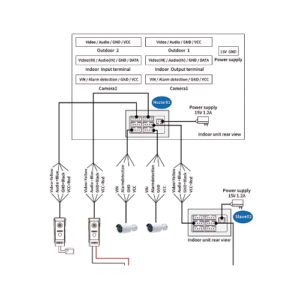
Description
Description:
This table provides a detailed list of the components found in the Btel indoor unit. Each component is assigned a number and a corresponding name, clearly outlining its function within the device.
Indoor Unit Installation Instructions
- Avoid strong radiation: Keep the unit away from TVs, computers, and VCRs.
- Prevent electric shock: Do not disassemble without permission.
- Handle with care: Avoid dropping, shaking, or impacting the device.
- Proper positioning: Install at least 150cm from the horizontal line of sight.
- Safety first: Turn off the power before installation.
- Maintain distance: Keep the unit more than 60cm away from AC power and avoid water, magnetic fields, and chemicals.
How to install the indoor unit:
- Materials: Plastic expansion tube, mounting plate, screws, wires.
- Distance: Install the unit 150-160cm from the ground.
Matters Needing Attention
a. Test Before Installation
- Open the package and check accessories: Ensure all components are present.
- Use original test cable: Connect the outdoor and indoor units using the provided cable.
- Verify functionality: Test the unit to ensure it works properly before installation.
- Follow connection diagram: Adhere strictly to the wiring diagram in the manual to avoid malfunctions or damage.
- Refer to access control power supply manual: If using an access control power supply (not included), consult its manual for instructions.
b. Maintenance
- Avoid non-company products: Do not use the unit with accessories or products not manufactured by the company.
- Follow user manual: Strictly adhere to the user manual for installation, testing, and operation.
- Seek technical support: Contact the company’s technical support for any questions or issues.
Components:
No. | Name |
---|---|
1 | IPS 7-inch touch screen |
2 | Microphone |
3 | Red power status indicator light (steady on) |
4 | Green motion detection status indicator light (steady on when activated) |
5 | Blue Wi-Fi status indicator light (steady on against successful network connection) |
6 | TF card slot (support up to 128GB) |
7 | Speaker |
8 | DC 15V 1.2A power port |
9 | Indoor unit signal output port |
10 | Indoor unit signal input port |
11 | Outdoor unit wiring port |
12 | Camera wiring port |
13 | Indoor unit mounting board slot |
14 | Indoor unit bracket |
Additional Information:
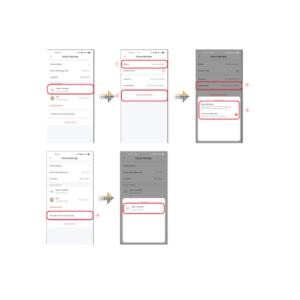
- The diagram includes dimensions (195mm x 132mm) and a reference number for each component.
- The image also shows a screenshot of the device’s user interface, specifically the “Remove a Bound Device” section.
Key Specifications:
Parameter | Value |
---|---|
Display screen | IPS 7-inch touch screen |
Resolution | 1024*600 |
Power supply | DC15V 1.2A |
Power | Standby: <3W, Working: ≤10W |
System support | 6 indoor units + 2 outdoor units + 2 cameras |
Signal type of outdoor unit | CVBS/AHD720 / AHD1080 |
Connected indoor unit | RVV4/CAT5E |
Ringing tones | 10 / Customized ringtones |
Language | Chinese, English, German, French, Russian, Spanish |
Monitoring duration | 60 seconds |
Intercom duration | 120 seconds |
WiFi | Tuya APP |
Motion detection | Support |
Extended storage | 128GB |
Installation mode | Wall hanging |
Material | ABS engineering plastic |
Dimension | 19513220mm |
Settings:
- Device Information and Modify Device Name: View or change the device’s name.
- Display Third-Party Applications Supported: Check which third-party apps are compatible with the device.
- Basic Settings: Adjust basic settings like screen orientation and time watermark.
- Advanced Settings: Access more in-depth settings options (specific details not visible in the image).
- Storage Settings:
- View the memory capacity of the device’s TF card.
- Format the TF card to erase all content, including custom ringtones.
- Switch Offline Reminder: Enable or disable notifications when the device goes offline.
- Share Device: Allow other phone users to access and control the device.
- Restart Device: Restart the indoor unit from the app.
- Remove Device: Unbind the indoor unit from the phone.
Quick Start Operation Guide
A. Button Instructions
- Call/Monitor: Press the call button on the outdoor unit to initiate a call to the indoor unit or enter monitoring mode.
E. APP Interface
- 1. Hang up/Exit: End the current call or exit monitoring mode.
- 2. Settings: Access the device’s settings menu.
- 3. Speaker: Activate the speaker to hear the outdoor unit’s sound.
- 4. Switch Channel: In call/monitoring mode, switch between door 1, door 2, camera 1, and camera 2.
- 5. Microphone: Communicate with the visitor at the outdoor unit using the microphone.
- 6. Take Photo: Capture a snapshot of the current outdoor unit or camera’s view.
- 7. Full Screen: Display the image in full screen mode.
- 8. Playback: Review recorded videos and photos stored on the TF card.
- 9. Album: Access the album to view saved snapshots and videos.
- 10. Unlock: Open the lock connected to the outdoor unit.
Wi-Fi Network Configuration
Description:
This section of the user manual provides step-by-step instructions for connecting the Btel indoor unit to a Wi-Fi network.
Key Steps:
-
Access Wi-Fi Settings:
- Tap on the top right corner of the screen.
- Select “Wi-Fi Network Configuration.”
-
Select Wi-Fi Network:
- Choose your desired 2.4GHz Wi-Fi network from the list.
- Enter the network password.
-
Connect to Network:
- Click “Next” to initiate the connection process.
- The phone will automatically search for and connect to the network.
-
Complete Setup:
- Once connected, click “Finish” to complete the Wi-Fi configuration.
Visitor Calls
D. Method 2: Wi-Fi Quick Connect
- Access Indoor Unit Menu: Click on the main menu icon on the indoor unit’s screen.
- Select Settings: Choose the “Settings” icon.
- Select Network Settings: Tap on the “Network Settings” icon.
- Choose Wi-Fi Quick Connect: Select “Wi-Fi Quick Connect” to enter the network configuration mode.
C. Method 2: Hotspot Network Configuration
- Access Indoor Unit Menu: Click on the main menu icon on the indoor unit’s screen.
- Select Settings: Choose the “Settings” icon.
- Select Network Settings: Tap on the “Network Settings” icon.
- Choose Hotspot Network Configuration: Select “Hotspot Network Configuration” to enter the network configuration mode.
- Navigate Back: Click on the bottom right corner to go back. A dialog box will appear asking if you want to restart. Click “OK.”
- Check Wi-Fi Hotspot: Verify if the “Wi-Fi Hotspot” is activated in the “Network Settings.”
- Configure with Phone: Once activated, use your phone to perform the network configuration.
If there is no dialog box when clicking the back button, the user needs to manually restart by going to: Settings → Advanced Settings → Restart System.
F. Motion Detection
-
Enable Motion Detection:
- In standby mode, tap the screen.
- Go to Settings → Door Unit Settings/Camera Settings.
- Select a device and turn on the motion detection switch.
-
Motion Detection Trigger: When motion detection is enabled and someone moves in front of the device, motion detection will be triggered. The system will record a video in the background.
-
View and Delete Recordings:
- Find the recorded image or video in the motion detection record history.
- Long press a video file to delete a single file or delete all.
Notes:
- TF Card Requirement: If there is no TF card, the indoor unit cannot capture or record video when motion is detected.
F. Network Settings
Network Mode:
- Two connection modes are available: Wi-Fi Quick Connect and Hotspot Connection.
Cloud Service:
- Indicates whether the network connection is established.
IP Address:
- Displays the IP address of the indoor unit.
MAC:
- Shows the Media Access Control (MAC) address of the indoor unit.
Wi-Fi Hotspot:
- The hotspot name required for hotspot connection.
- The indoor unit needs to be restarted to activate the hotspot.
Password:
- The password required for hotspot connection.
Notes:
- When “Hotspot Connection” is selected as the network mode, clicking the return button will prompt the restart system dialog box.
- Select “Restart System” to activate the hotspot.
- The hotspot connection is related to both Wi-Fi Quick Connect and Hotspot Connection.
Scene Mode
Description:
This section of the user manual outlines the different scene modes available on the Btel indoor unit. Each mode offers specific settings and functionalities tailored to different usage scenarios.
Modes:
-
Home Mode:
- Normal working mode.
- Activates the message function when there is an incoming call without an answer.
- The ringtone stops, and the message function is activated.
-
Away Mode:
- Automatically activates the message function when a visitor calls.
-
Sleep Mode:
- Mutes the indoor unit (mute duration is related to the ringtone length).
- Activates the message function after the ringtone stops.
Key Points:
- Customization: The scene modes allow users to customize the indoor unit’s behavior based on their specific needs and preferences.
- Message Function: The message function is automatically activated in Away and Sleep modes, providing a convenient way to communicate with visitors.
- Mute Functionality: Sleep mode offers a mute option to avoid disturbances.
Reviews
There are no reviews yet.